
1.新买vps需要设置的地方
1.1 初步设置
sudo -i # 切换到root用户

apt update -y  # 升级packages

apt update && apt upgrade -y

apt install wget curl sudo vim git -y  # Debian系统比较干净,安装常用的软件
注意:VPS的内存如果过小,建议设置一下SWAP,一般为内存的1-1.5倍即可,可以让系统运行更流畅!
设置SWAP或bbr可以用脚本:
wget -O box.sh https://raw.githubusercontent.com/BlueSkyXN/SKY-BOX/main/box.sh && chmod +x box.sh && clear && ./box.sh

bbr:
wget -N --no-check-certificate "https://github.000060000.xyz/tcpx.sh" && chmod +x tcpx.sh && ./tcpx.sh
1.2 Ubuntu 20.04 & Ubuntu18.04 快速开启 TCP BBR 实现高效单边加速
Linux Kernel 内核升级到 4.9 及以上版本可以实现 BBR 加速,由于Ubuntu 18.04 默认的内核就是 4.15版本的内核,由于Ubuntu 20.04 默认的内核就是 5.4 版本的内核,并已经默认编译了 TCP BBR 模块,所以可以直接通过参数开启。
新的 TCP 拥塞控制算法 BBR (Bottleneck Bandwidth and RTT) 可以让服务器的带宽尽量跑慢,并且尽量不要有排队的情况,让网络服务更佳稳定和高效。
修改系统变量:
echo net.core.default_qdisc=fq >> /etc/sysctl.conf
echo net.ipv4.tcp_congestion_control=bbr >> /etc/sysctl.conf
保存生效
sysctl -p
执行
sysctl net.ipv4.tcp_available_congestion_control
如果结果是这样
sysctl net.ipv4.tcp_available_congestion_control
net.ipv4.tcp_available_congestion_control = bbr cubic reno
就开启了。 执行 lsmod | grep bbr ,以检测 BBR 是否开启。
来源:感谢这位@妙正灰
1.3 三网测速脚本
1.
wget -N --no-check-certificate https://raw.githubusercontent.com/V2RaySSR/vps/master/vpstest.sh && bash vpstest.sh
2.
bash <(curl -Lso- https://www.infski.com/files/superspeed.sh)
3.
bash <(wget -qO- --no-check-certificate https://gitlab.com/spiritysdx/za/-/raw/main/ecs.sh)
4.
bash <(curl -Lso- https://git.io/superspeed_uxh)
去程:去IPIP上查看:https://tools.ipip.net/traceroute.php
1.4 奈飞检测脚本
wget -O nf https://github.com/sjlleo/netflix-verify/releases/download/2.5/nf_2.5_linux_amd64 && chmod +x nf && clear && ./nf

bash <(curl -L -s check.unlock.media)
GitHub原地址:https://github.com/back8/github_sjlleo_netflix-verify
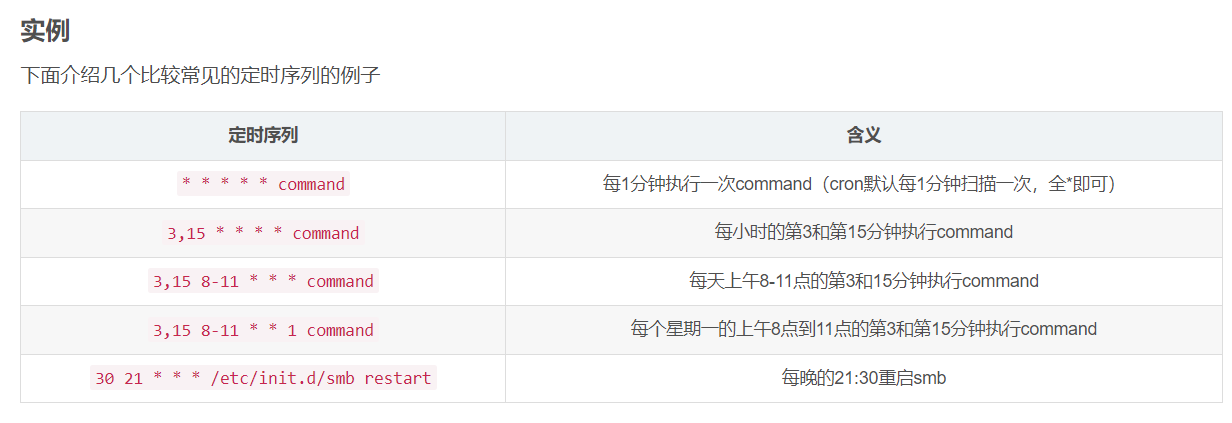
1.5 安装cron
apt-get install cron

漫长的等待后就可以启动了

先找到service在哪

whic service

这样你就有了service具体目录了

然后

/usr/sbin/service cron start
就这样启动成功了,可以愉快地打 crontab -e了 (或者crontab -l)
查看状态:service cron status
启动服务:service cron start
停止服务:service cron stop
重启服务:service cron restart

#注意修改服务器时区,以便crontab能按计划进行
sudo timedatectl set-timezone Asia/Shanghai #将时区更改为上海,并自动将当前时间转换为上海时间

date #检查是否已更改时区和时间
1.6 服务器基础测试
curl -sL yabs.sh | bash -s -- -i
1.7 回程路由测试脚本
curl https://raw.githubusercontent.com/zhucaidan/mtr_trace/main/mtr_trace.sh|bash  #简洁版

wget -qO- git.io/besttrace | bash  #详细版
2.安装docker 及docker-compose
2.1 非大陆服务器安装docker
wget -qO- get.docker.com | bash

docker -v  #查看docker版本

systemctl enable docker  # 设置开机自动启动
设置docker日志大小,防止塞满硬盘
cat > /etc/docker/daemon.json <<EOF
{
    "log-driver": "json-file",
    "log-opts": {
        "max-size": "20m",
        "max-file": "3"
    },
    "ipv6": true,
    "fixed-cidr-v6": "fd00:dead:beef:c0::/80",
    "experimental":true,
    "ip6tables":true
}
EOF
然后重启 Docker 服务:
systemctl restart docker
非大陆服务器安装docker-compose
sudo curl -L "https://github.com/docker/compose/releases/latest/download/docker-compose-$(uname -s)-$(uname -m)" -o /usr/local/bin/docker-compose && sudo chmod +x /usr/local/bin/docker-compose

# 如果 /usr/local/bin 不在环境变量 PATH 里
# ============================可选================================
sudo ln -s /usr/local/bin/docker-compose /usr/bin/docker-compose
# ============================可选================================

docker-compose --version  #查看docker-compose版本
2.2 国内服务器安装docker
安装docker
curl -sSL https://get.daocloud.io/docker | sh

docker -v  #查看docker版本

systemctl enable docker  # 设置开机自动启动
限制日志大小
cat > /etc/docker/daemon.json <<EOF
{
    "log-driver": "json-file",
    "log-opts": {
        "max-size": "20m",
        "max-file": "3"
    },
    "ipv6": true,
    "fixed-cidr-v6": "fd00:dead:beef:c0::/80",
    "experimental":true,
    "ip6tables":true
}
EOF
然后重启 Docker 服务:
systemctl restart docker
大陆服务器安装docker-compose
curl -L https://get.daocloud.io/docker/compose/releases/download/v2.1.1/docker-compose-`uname -s`-`uname -m` > /usr/local/bin/docker-compose
复制然后输下面
chmod +x /usr/local/bin/docker-compose
复制然后输下面
docker-compose --version  #查看docker-compose版本
如果docker安装不了程序
如果docker run时出现下列
docker: Error response from daemon: failed to create shim task: OCI runtime create failed: runc create failed: unable to start container process: error during container init: unable to apply apparmor profile: apparmor failed to apply profile: write /proc/self/attr/apparmor/exec: no such file or directory: unknown.
似乎是 docker-ce 本身的问题。应该在docker-ce=23.0.1中解决,
还有一个解决方案:在升级到 docker 23.0.1 之前安装 apparmor 或在安装 apparmor 后重新启动 docker。
apt install apparmor然后重新启动docker,例如systemctl restart docker。
还有一种可能
ubuntu 22.10 的 vanilla OS 上遇到了同样的问题。
它发现 /etc/apparmor.d/tunebles 上缺少一个名为 home 的文件。
由于启动错误,sudo systemctl status apparmor 应显示为非活动状态。
debian11 上的 /etc/apparmor.d/tunebles/home 是:
#
#    Copyright (C) 2006-2009 Novell/SUSE
#    Copyright (C) 2010 Canonical Ltd.
#
#    This program is free software; you can redistribute it and/or
#    modify it under the terms of version 2 of the GNU General Public
#    License published by the Free Software Foundation.
#
# ------------------------------------------------------------------

# @{HOME} is a space-separated list of all user home directories. While
# it doesn't refer to a specific home directory (AppArmor doesn't
# enforce discretionary access controls) it can be used as if it did
# refer to a specific home directory
@{HOME}=@{HOMEDIRS}/*/ /root/

# @{HOMEDIRS} is a space-separated list of where user home directories
# are stored, for programs that must enumerate all home directories on a
# system.
@{HOMEDIRS}=/home/

# Also, include files in tunables/home.d for site-specific adjustments to
# @{HOMEDIRS}.
include <tunables/home.d>
只需创建此文件并重新启动系统,以确保一切都重新启动,就可以解决问题
3 保护vps措施
3.1 更改ssh端口
nano /etc/ssh/sshd_config
然后把#号给删除 改port后的数字,在按ctrl+x,按y,按回车,保存退出
重启 ssh 服务,使变更生效
sudo service sshd restart
3.2 更改ssh连接密码
passwd
接下来按提示修改就行
3.3 安装ufw防火墙
sudo apt install ufw
查看是否启动
sudo ufw status
设置默认值
sudo ufw default deny incoming
sudo ufw default allow outgoing
允许SSH连接
如果没有改端口:
sudo ufw allow ssh
改后
sudo ufw allow xxxx/tcp comment 'SSH'
允许http
sudo ufw allow http
允许https
sudo ufw allow https
启动ufw
sudo ufw enable
查看ufw状态
sudo ufw status
删除规则
sudo ufw status numbered

sudo ufw delete 5
重载配置
sudo ufw reload
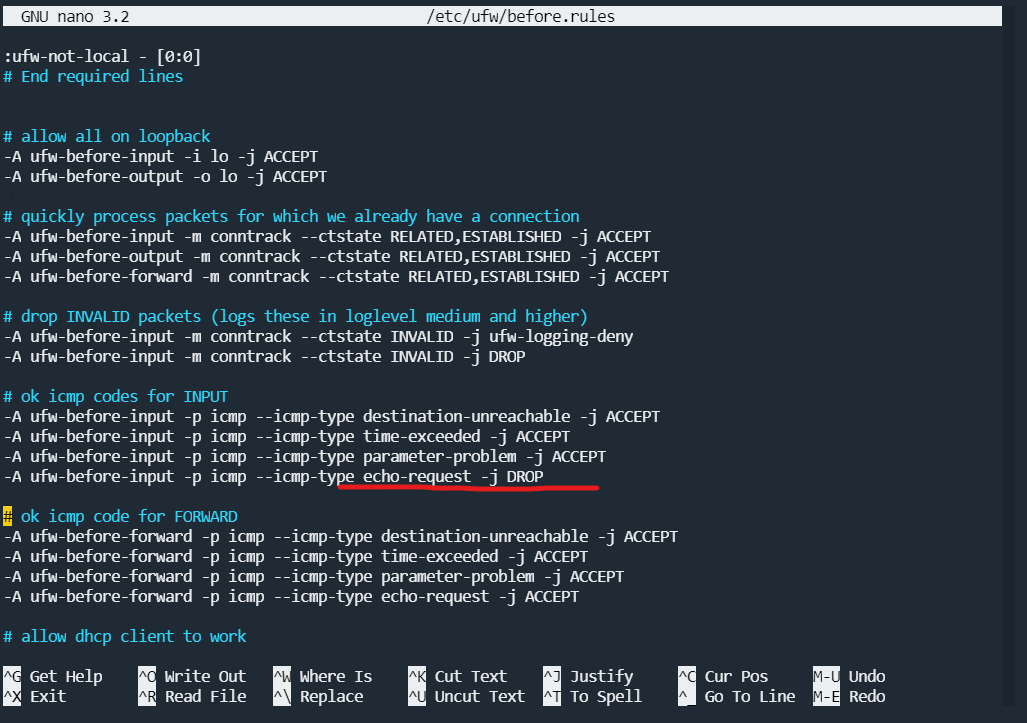
4 禁止ping
sudo nano /etc/ufw/before.rules
搜索:echo-request,把ACCEPT改成DROP
5 防爆力破解
安装fail2ban
sudo apt update && sudo apt install fail2ban
cd /etc/fail2ban # 进入fail2ban目录
sudo cp fail2ban.conf fail2ban.local  # 复制一份配置文件
sudo nano fail2ban.local   #进行编辑
插入以下代码
[sshd]
enable = ture
port = 9753   # 注意改成自己对应的端口
filter =sshd
logpath = /var/log/auth.log
maxretry = 3
bantime = -1
启动发现fail2ban启动失败,原因是找不到日志文件,发现默认情况下,debian不再有/var/log/auth.log文件,解决办法是安装rsyslog,安装后就有auth.log文件了。
apt-get install rsyslog
systemctl restart fail2ban
systemctl status fail2ban
sudo service fail2ban restart #重启
sudo fail2ban-client status #查看状态
sudo fail2ban-client status sshd #查看sshd的详细状态
这次fail2ban启动正常了,也开始工作了。但发现ban的ip尽然还能访问,查了一圈发现是没有iptables,fail2ban依赖于iptables实现ban ip,好吧,安装iptables:
apt install iptables
现在一切正常了。
sudo fail2ban-client set sshd unbanip 192.0.0.1 #解禁指定IP
常见命令
#查看当前被禁止登陆的ip
fail2ban-client status ssh-iptables
[root@debian]# fail2ban-client status ssh-iptables
Status for the jail: ssh-iptables
|- Filter
|  |- Currently failed: 0                   # 当前失败次数
|  |- Total failed:     3                   # 总失败次数
|  `- File list:        /var/log/auth.log   # 日志文件路径列表
`- Actions
   |- Currently banned: 1                   # 当前禁止访问的IP数量
   |- Total banned:     1                   # 禁止IP总数

#取消ban某个ip
fail2ban-client set ssh-iptables unbanip 42.34.45.78
#如果修改了配置需要重启生效:
fail2ban-client reload
4 dd系统脚本
适合绝大部分VPS使用
DD成功:oci aws az rn vultr layerstack
DD失败:cc ibmlinuxone
重装前请务必备份数据,欢迎分享更多机型DD情况
重装
bash <(wget --no-check-certificate -qO- 'https://raw.githubusercontent.com/MoeClub/Note/master/InstallNET.sh') -d 11 -v 64 -p 123456 -port 22
系统参数
-d 10 【7、8、9、10,11】Debian
-u 20.04 【14.04、16.04、18.04、20.04】Ubuntu
密码参数,可以改成别的
-p 12345
端口参数
port 22
安装完成后VPS会重启安装,等待10分钟左右,尝试重新连接
用户名为root
密码是你设置的
成功连接后输入下面的更新组件和BBR命令,完善基础系统环境
更新组件
apt update -y && apt install -y curl && apt install -y socat && apt install wget -y
BBR
wget -N --no-check-certificate "https://raw.githubusercontent.com/chiakge/Linux-NetSpeed/master/tcp.sh" && chmod +x tcp.sh && ./tcp.sh
5 咸蛋面板安装
闲蛋中转面板是在原作者的面板基础上noobcfy大佬二次开发的一款多协议中转面板,首次开放公测发布于全球主机交流论坛。
5.1 安装教程
推荐使用官方一键安装脚本
bash <(wget --no-check-certificate -qO- 'https://sh.xdmb.xyz/xiandan/xd.sh')
官方一键升级脚本
bash <(wget --no-check-certificate -qO- 'https://sh.xdmb.xyz/xiandan/xd.sh') update
安装完毕后耐心等待几分钟才能访问。访问地址就是 IP:端口号,默认的账号和密码都是admin
6 参考资料
1.咕咕鸽
2.科技loin
3.duangvps交流群