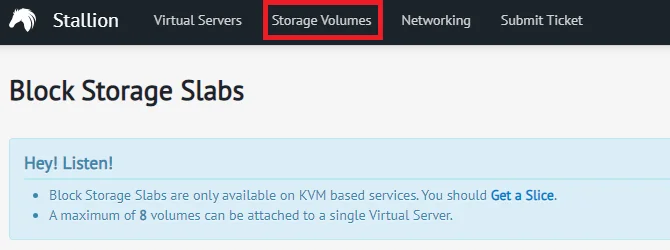
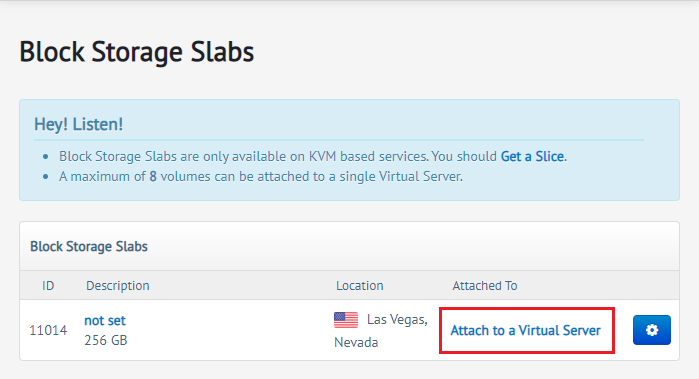
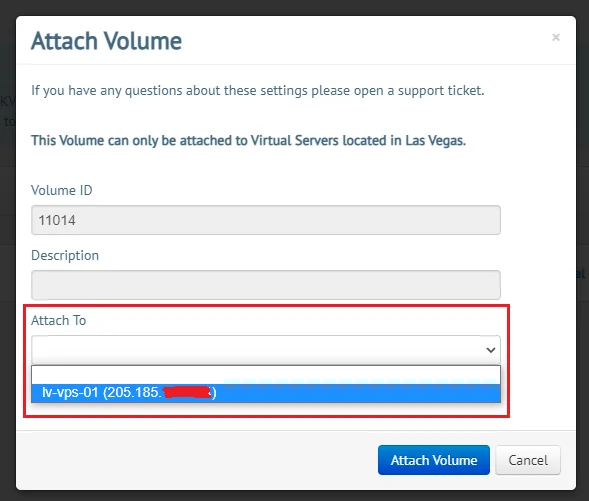
1 后台添加储块
丢几张图片


然后点击“Attach Volume”完成绑定,重启对应的VPS。
2. ssh连接vps操作
2.01 然后在vps的ssh客户端输入:fdisk -l
[root@prtg ~]# fdisk -l
Disk /dev/vda: 10 GiB, 10737418240 bytes, 20971520 sectors
Units: sectors of 1 * 512 = 512 bytes
Sector size (logical/physical): 512 bytes / 512 bytes
I/O size (minimum/optimal): 512 bytes / 512 bytes
Disklabel type: dos
Disk identifier: 0x508858de
Device     Boot    Start      End  Sectors  Size Id Type
/dev/vda1  *        2048 19920511 19918464  9.5G 83 Linux
/dev/vda2       19920512 20969087  1048576  512M 82 Linux swap / Solaris
Disk /dev/sda: 256 GiB, 274877906944 bytes, 536870912 sectors   #这里可以看到256G的硬盘
Units: sectors of 1 * 512 = 512 bytes
Sector size (logical/physical): 512 bytes / 512 bytes
I/O size (minimum/optimal): 512 bytes / 512 bytes
2.02 先对对新添加的磁盘进行分区
使用命令分区:fdisk /dev/sda (默认添加的存储块的磁盘信息是/dev/sda)
[root@prtg ~]#  fdisk /dev/sda   #分区命令

Welcome to fdisk (util-linux 2.32.1).
Changes will remain in memory only, until you decide to write them.
Be careful before using the write command.

Device does not contain a recognized partition table.
Created a new DOS disklabel with disk identifier 0xb12d8bec.

Command (m for help): n   #这里输入n
Partition type
   p   primary (0 primary, 0 extended, 4 free)
   e   extended (container for logical partitions)
Select (default p): p
Partition number (1-4, default 1): 2
First sector (2048-536870911, default 2048): 2048    #这里就默认即可
Last sector, +sectors or +size{K,M,G,T,P} (2048-536870911, default 536870911):     #默认即可

Created a new partition 2 of type 'Linux' and of size 256 GiB.

Command (m for help): w    #这里输入w
The partition table has been altered.
Calling ioctl() to re-read partition table.
Syncing disks.
2.3 查看新的分区:运行命令 fdisk -l。如果出现以下信息,说明已经成功创建了新分区
[root@prtg ~]# fdisk -l
Disk /dev/vda: 10 GiB, 10737418240 bytes, 20971520 sectors
Units: sectors of 1 * 512 = 512 bytes
Sector size (logical/physical): 512 bytes / 512 bytes
I/O size (minimum/optimal): 512 bytes / 512 bytes
Disklabel type: dos
Disk identifier: 0x508858de

Device     Boot    Start      End  Sectors  Size Id Type
/dev/vda1  *        2048 19920511 19918464  9.5G 83 Linux
/dev/vda2       19920512 20969087  1048576  512M 82 Linux swap / Solaris


Disk /dev/sda: 256 GiB, 274877906944 bytes, 536870912 sectors
Units: sectors of 1 * 512 = 512 bytes
Sector size (logical/physical): 512 bytes / 512 bytes
I/O size (minimum/optimal): 512 bytes / 512 bytes
Disklabel type: dos
Disk identifier: 0xb12d8bec

Device     Boot Start       End   Sectors  Size Id Type
/dev/sda2        2048 536870911 536868864  256G 83 Linux
2.04 查看数据块编号(开通邮件里也有)
ls /dev/disk/by-id/
执行命令效果:
[root@prtg ~]# ls /dev/disk/by-id/
ata-QEMU_DVD-ROM_QM00004  scsi-0BUYVM_SLAB_VOLUME-2898
假设看到的结果是scsi-0BUYVM_SLAB_VOLUME-2898,那么2898就是数据块的id,或者后台也能直接看到。
2.05 格式化
分区创建好之后,就需要格式化分区了,命令如下:
mkfs.ext4 -F /dev/disk/by-id/scsi-0BUYVM_SLAB_VOLUME-2898
2.06 创建文件夹
mkdir /pt
2.07 挂载
挂载到www下面,当然你可以挂载到别的文件夹,这里就是以www为例。注意,如果这个目录有文件,那么文件都会被清除。
mount -o discard,defaults /dev/disk/by-id/scsi-0BUYVM_SLAB_VOLUME-2898 /pt
2.08 设置开机/重启自动挂载
echo '/dev/disk/by-id/scsi-0BUYVM_SLAB_VOLUME-2898 /pt ext4 defaults,nofail,discard 0 0' | sudo tee -a /etc/fstab
2.09 如果出现错误:mkfs: failed to execute mkfs.ext4: No such file or directory
解决方法如下,因为需要安装e4fsprogs,Centos下安装命令如下:
yum install e4fsprogs -y
执行完成之后,就可以执行:mkfs.ext4 -F /dev/disk/by-id/scsi-0BUYVM_SLAB_VOLUME-2898
2.10 最后执行命令df -h就可以看到硬盘已经挂载好了。
[root@prtg ~]# df -h
Filesystem      Size  Used Avail Use% Mounted on
devtmpfs        224M     0  224M   0% /dev
tmpfs           239M     0  239M   0% /dev/shm
tmpfs           239M  6.4M  233M   3% /run
tmpfs           239M     0  239M   0% /sys/fs/cgroup
/dev/vda1       9.3G  893M  8.0G  10% /
tmpfs            48M     0   48M   0% /run/user/0
/dev/sda        251G   61M  239G   1% /www
2.11 给予文件夹权限
chmod -R 777 /pt
3 安装 pb
3.1 创建对应目录并编写 Docker-Compose 文件
cd /pt
mkdir qBittorrent #创建qbitorrent数据文件夹
cd qBittorrent
mkdir config downloads #创建配置文件目录与下载目录
nano docker-compose.yml #创建并编辑文件
3.2 这里使用docker-compose 安装
version: "2"
services:
  qbittorrent:
    image: linuxserver/qbittorrent
    container_name: qbittorrent
    environment:
      - PUID=1000
      - PGID=1000
      - TZ=Asia/Shanghai # 你的时区
      - UMASK_SET=022
      - WEBUI_PORT=8081 # 将此处修改成你欲使用的 WEB 管理平台端口
    volumes:
      - /pt/qBittorrent/config:/config # 绝对路径请修改为自己的config文件夹
      - /pt/qBittorrent/downloads:/downloads # 绝对路径请修改为自己的downloads文件夹
    ports:
      # 要使用的映射下载端口与内部下载端口,可保持默认,安装完成后在管理页面仍然可以改成其他端口。
      - 6881:6881
      - 6881:6881/udp
      # 此处WEB UI 目标端口与内部端口务必保证相同,见问题1
      - 8081:8081
    restart: unless-stopped
3.3 执行docker-compose
docker-compose up -d # docker-compose
# 执行后,如果得法,访问 ip:web-ui-port 即可进入管理页面。
# 默认用户名密码admin/adminadmin
4 2023.3.18更新 qb盒子安装
点击这里查看杰瑞佬的qb项目地址
1.安装一键脚本: 默认IP:8080 登录
bash <(wget -qO- https://raw.githubusercontent.com/jerry048/Dedicated-Seedbox/main/Install.sh) <username> <password> <Cache Size(unit:MiB)>
2.qBittorrent选Y
3.Deluge选N
4.Autoremove-torrents选N
5.Tweaked_BBR选Y
6.输入:reboot 重启
7.重启后等待3-5分钟,输入:lsmod | grep bbr,出现tcp_bbrx和tcp_bbr,再次输入reboot重启
备注:如果只出现tcp_bbr等待一会。
qB地址——机器的ip:8080 用户名密码为代码中写的
5 摘自
1.大鸟博客
2.咕咕鸽
